The invoice entry function allows you to enter costs received from suppliers of capital development costs and overhead services. The specialised nature of the allocation of costs to companies, estates, stages and projects necessitates the existence of this function in the Development Ledger as opposed to the Accounts Payable Ledger. As well as entering costs that are associated with developments you can also enter costs that are simply dissected to the accounts payable module.
It is important to note that this function interacts with the Inter Company Loan Sets which allow you to enter invoices in one company for costs in another and the system will debit and credit the correct loan accounts between companies.
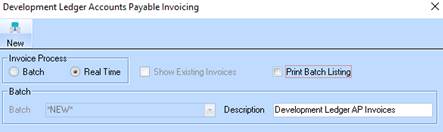
1. Select the Invoice button from the Toolbar or Transactions Ø Invoice Entry.
2. The following dialogue box will be displayed:
3. Select the New button.
4. The following window will be displayed:
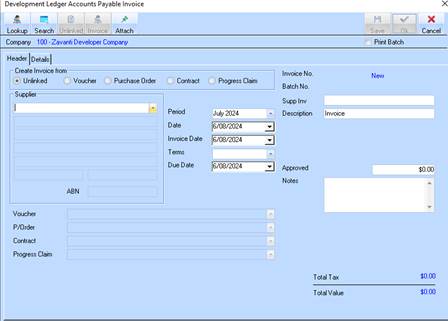
5.
The Supplier pick list is populated with the codes, name and entity types of all
of the suppliers in the current company. Select a Supplier for the invoice you
are entering by pressing the dropdown arrow  and selecting a
Supplier.
and selecting a
Supplier.
6. The Period pick list will be populated with all of the open periods for the current company. It will by default be set to the current period for the company for the development ledger. Leave the value as defaulted and press the Tab key.
7. The Date field is the date that you wish to start to age this invoice from. Even if the date on the invoice is different this is the date that you recognise the invoice, not the date your supplier does. The main reason for this is that you may have an invoice issued in a prior period, and the date will need to be within the selected period.
8.
The Invoice Date is the date on the paper invoice. This field will default to
the current date. To enter another date, select the drop down arrow. For example, leave the value as
defaulted and press the Tab key.
9. The Due Date field is the date the invoice requires payment by. This field is calculated by the system using the Invoice Date and Payment Terms entries. Leave the value as defaulted and press the Tab key.
10. The Terms pick list will default to that value specified against the Supplier’s record. You can override this value should you have a differing arrangement for a specific invoice. Leave the value as defaulted, and press the Tab key.
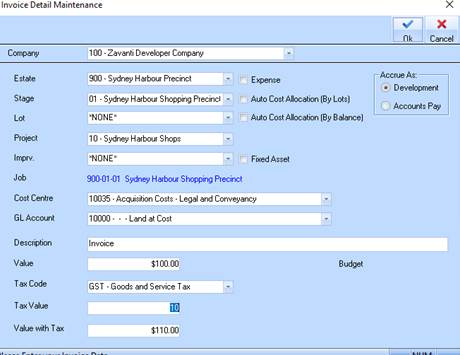
11. The Description field is used to enter a short description for the invoice. Click on Details tab and select the New button. The following window will be displayed:
|
|
It is very important to enter a specific description for the invoice so as to easily identify it in a Listing report or Enquiry. |
12. The Company pick list will default to the Most Used Company as specified in the Sales Defaults window. You may change the Company As the development ledger enables you to post costs against multiple companies from a single invoice. Leave the value as defaulted and press the Tab key.
13. The Estate pick list will default to the Most Used Estate specified in the Sales Defaults window. Leave the value as defaulted and press the Tab key.
14. The Stage pick list will default to the Most Used Stage specified in the Sales Defaults window. Leave the value as defaulted and press the Tab key.
|
|
If you select a Lot, you may not select a Project for this transaction. These values are mutually exclusive in relation to Improvements. |
15. Select an
entry from the Lot pick list by pressing the dropdown arrow  .
Press the Tab key twice.
.
Press the Tab key twice.
16. Select an entry from the Imprv. (Improvement) field and press the Tab key.
17. The Cost Centre pick list will be populated with all of the codes and names of the Cost Centres that you have set up using the Maintenance Menu, Cost Centres. You will need to select a code to dissect your invoice row to. When you click on OK to process the invoice the system will read the Debit Account from the Cost Centre to allocate a general ledger account for this row. The Cost Centre will be allocated to the Development Ledger transaction. Select a value from the list and press the Tab key.
18. Based on your selection, the system will default entries in the GL Account & Tax Code fields. Leave these values as selected and position your cursor in the Description field.
19. Specify a unique Description for the invoice and press the Tab key.
20. The Value field represents the value of your invoice row dissection excluding tax. You can enter a value here and have the system use the tax percentage to work out the tax inclusive price. Specify a value and press the OK button.
21. The system will present you with the same window to enable you to process multiple invoices.
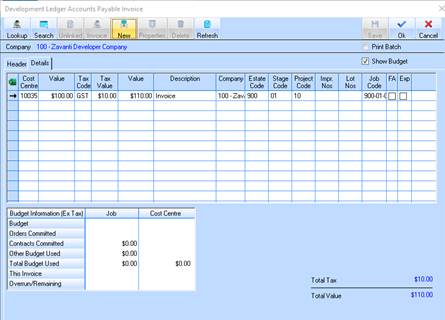
22. You will notice the details of the invoice you have just entered will now appear in the Line Items Display section of the window.
23. The selected Print Batch check box instructs the system to print you a listing of your data entry when you choose the OK pushbutton on the invoice entry window. For example, uncheck the box and press the OK button.
24. The system will refresh the window to allow you to continue processing. Press the Close button.
Accounts Payable Invoice Batch Posting
If you elect to input the invoices in batch, you will need to complete this transaction in order to post the amounts.
1. Select a menu path of Transactions Ø Invoice Batch Posting.
2. The following window will be displayed:

3.
Select the batch you want to post by selecting the Tag  checkbox. Press the Post
button.
checkbox. Press the Post
button.

