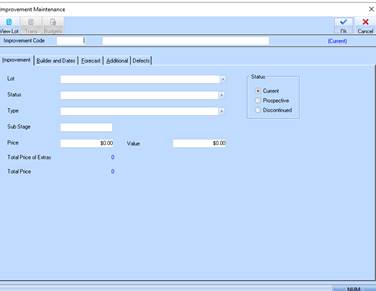
1. From the Projects window select the New button. The following window will be displayed:
2. The Improvement Code is the code by which you will know your improvement. This code will appear in selection boxes, on reports and in display only fields whenever you are dealing with this improvement. It is a number that can have 2 decimal places (i.e. Improvement 1.20) and must be entered when creating a new improvement. Enter a value and press the Tab key.
3. The Improvement Name field is the long hand name by which you want to know your improvement. This will appear on headings in reports and in pick lists. Enter a meaningful description and press the Tab key.
4. The Lot pick list will be populated with the Codes and Names of all your lots/blocks that have not already been assigned to another improvement. Select a Lot and press the Tab key.
5. The Status pick list is used to assign a Stock Status. An example would be Available for Sale, Reserved etc. Select a Status from the pick list and press the Tab key.
6. The Type field is used to define the type of improvement you are assigning to the lot. An example would be a parking lot or storage space for an apartment block. Select a value from the list and press the Tab key.
7. The Sub Stage field is used to provide you with an additional value to further breakdown estates, stages and projects. Leave the field blank and press the Tab key.
8. The Price field is used to input the price you wish to see an Improvement at. It must exclude any taxes as the system will calculate tax on your behalf. Enter a value and press the Tab key.
9. The Value field is used to assign a cost of each improvement. This value will be used by the sales process to use the margin scheme to calculate a tax value at sales time. You may leave this value blank if you do not intend to use the margin scheme. For example, leave the field blank and press the Builders and Dates tab. The following window will be displayed:
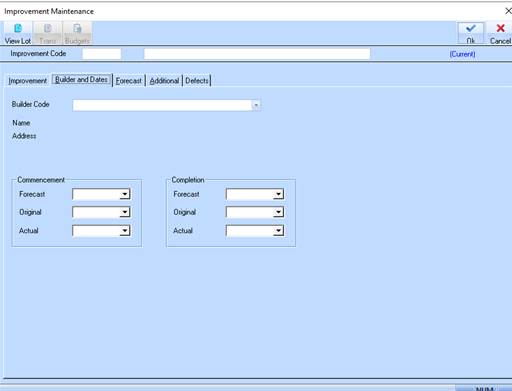
10. The Builder Code pick list will display a list of the codes of the Builders you have created. Select a value from the list and press the Tab key.
11. The Name field is a display only field that will based on your selection of the Builder Code will display the name of the builder.
12. The Address field will display the address details of the Builder you have selected.
13. The Commencement dates are used for the following:
•Forecast – to input the forecast commencement date.
•Original – to input the original commencement date.
•Actual – to input the actual commencement date.
14. Select the Forecast tab. The following window will be displayed:
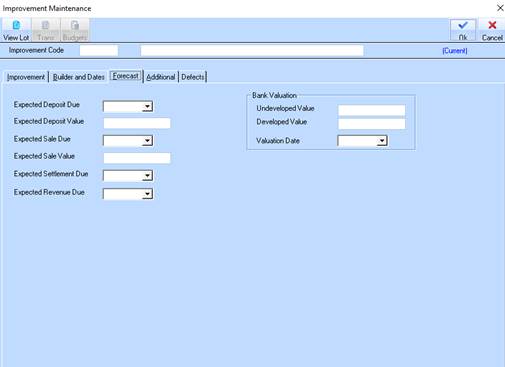
15. The Expected Deposit Due is the date that you expect to receive the deposit for the sale. Enter a date and press Tab.
16. The Expected Deposit Value is the amount that you expect to receive for the deposit. Enter a dollar value and press Tab.
17. The Expected Sale Due is the date that the sale is expected by. Leave the field blank and press Tab.
18. The Expected Sale Value is the total sale value that you expect to receive. Leave the field blank and press Tab.
19. The Expected Settlement Due is the date when you expect the settlement to occur. Enter a date in the future and press Tab.
20. The Expected Revenue Due is the date when you expect to receive the full entitlement. Leave the field blank and press Tab.
21. The Undeveloped Value this is the value of the property undeveloped as assessed by the Bank. Enter a dollar value and press Tab.
22. The Developed Value this is the value of the property where development has occurred as assessed by the Bank. Enter a dollar value and press Tab.
23. The Valuation Date is the date the bank valued the property. Enter a date and press the Additional tab. The following window will be displayed:
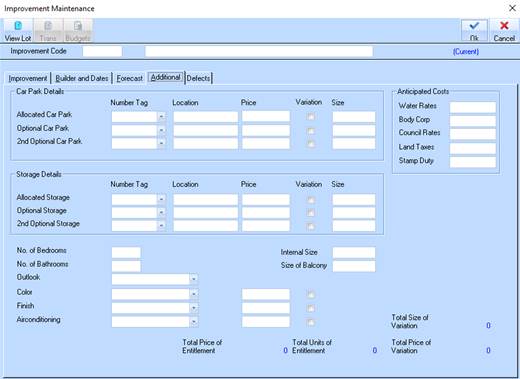
24. The Additional window allows you to enter details of improvements for the Project. For example, if the sale was an apartment and included in the sale price was one car park however, the purchaser wanted to secure an additional car space, details are recorded here and transferred to the overall price within the sales process.
25. Position
your cursor in the Allocated Car Park pick list. Select the drop down  arrow.
|
|
If no data exists, you may create new Improvement Additions by right clicking the field and selecting New. This achieves the same action as the menu path Maintenance Ø Improvement Additions. |
26. Select a
value from the list. The system will populate the Location, Price and Size
fields based on those specified against the car park. If the price is a
variation on the original sale, you may select the Variation  checkbox. The window will
be refreshed with the value of the Improvement as follows:
checkbox. The window will
be refreshed with the value of the Improvement as follows:
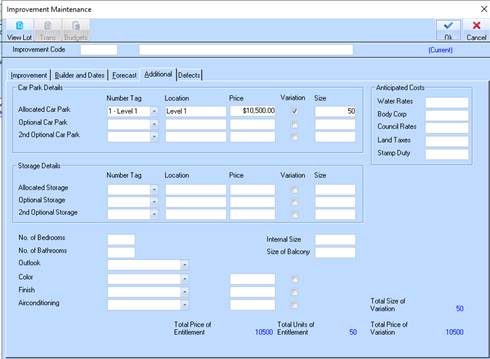
27. Note that the Total Price of Variation display field will now be updated with the cost of the Improvement.
28. For
example, the purchaser also would like to select a paint colour that is not a
standard option within the sales price. Position your cursor in the Colour pick
list and press the drop down arrow. Select a colour from the list and
press Tab.
29. In the
Price field, enter a dollar value for the improvement. To indicate it is a
variation, select the Variation checkbox.
30. Select the Defects tab. The following window will be displayed:
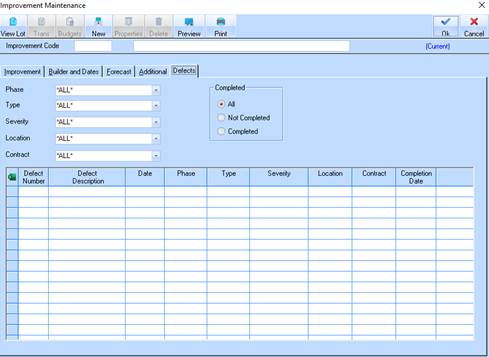
31. The Defects window allows you to capture details of all defects recorded that require resolution.
32. To create a new Defect, select the New button. The following window will be displayed:
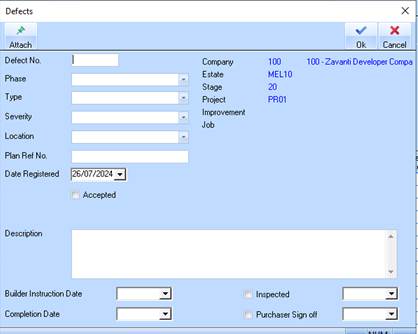
33. In the Defect Number field, enter a value and press Tab.
34. The Phase pick list is used to indicate the phase when the defect occurred. An example would be Roofing, Land Scaping, and Plastering etc. Select a value from the list and press Tab.
35. The Type pick list is used to indicate the type of defect it is. Select a value from the list and press Tab.
36. The Severity pick list is used to assign a severity level to the defect. Select a value from the list and press Tab.
37. The Location pick list is used to indicate where the defect occurred. Select a value from the list and press Tab.
38. The Plan ref field is used to enter plan details. Leave the field blank and press Tab.
39. The Date Registered field is used to enter the date the defect was recorded. This field defaults to the current date. Leave the field as defaulted, and press Tab.
40. The Accepted checkbox is used to indicate that the builder and developer have agreed to the validity of the defect and that it will be rectified. Leave the checkbox unselected and press Tab.
41. The Description field is used to enter a description of the defect. Enter some text pertaining to the defect and press Tab.
42. The Builder Instruction Date pick list is used to enter the date the Builder was notified of the defect. Select a date from the list and press Tab.
43. The Completion Date pick list is used to enter the date the defect was rectified. Leave the field blank.
44. The Inspected checkbox and pick list are used to indicate that when the builder has rectified the defect, the work has been inspected and the date it was inspected on. Leave the field and checkbox blank.
45. The Purchaser Sign Off checkbox and pick list are used to indicate that the purchaser has acknowledged the defect has been rectified. Leave the field and checkbox blank.
46. Press the OK button.
