The following section is a simple guide on how to create a new forecast.
1. Open the Forecasting module (or access from the Job Core Forecasting menu)
2. A list of all the jobs will appear, based on the selected filters from the VIEW Menu
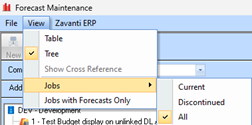
3. For example, to view only jobs with previous forecasts against them, select View > Jobs with forecasts only (this will put a tick next to this selection). To change the view back to all jobs, select View > Jobs with forecasts only (this will remove the tick from this selection).
4. You can also select whether you wish to view jobs in a TABLE window or TREE view from this menu.
5.
Highlight one of the jobs shown and click NEW to create a new Forecast for the
selected Job 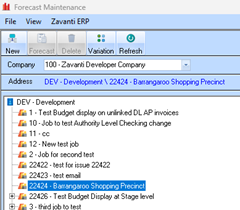
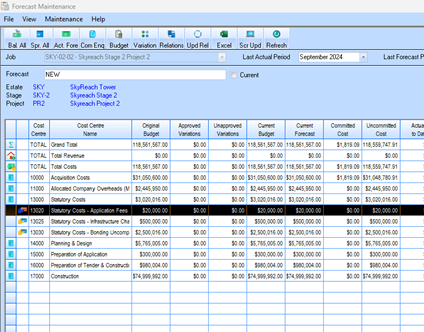
6. Set the Last Actual Period and Last Forecast Period and press Refresh.

The Last Forecast Period will
need to be after the Last Actual Period. By default, the Last Actual Period will
be one month past the “Current Period (as set in the Systems Maintenance module)
and the Last Forecast Period will be the last period set up in the Systems
Maintenance module, Forecast period for the selected entity.
7. Once the user clicks ‘refresh’ the selected Jobs data is shown in the Forecast window. The Forecast window displays all the Budget, Variation, Committed Costs, from PO’s Contracts, and other transactions, as well as the month-by-month ‘actuals’ that are derived from invoiced and manual payments and receipts and the month-by-month forecast values as maintained
|
|
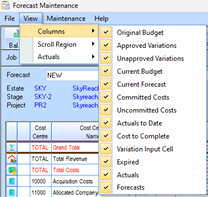
The Forecasting module has the capability to which columns you would like to display on your screen. You can control this from the VIEW>COLUMNS MENU option shown here (a tick will appear next to the visible columns)
|
8. All lines will appear in red if the current budget has not yet been forecasted. The amount remaining to be forecasted will appear in the “expired” column. In other words, the Current Budget LESS Actuals to Date (up to selected period) should equal the total Forecast. The difference will be shown in the ‘expired’ column

|
|
The Forecasting module has the capability to set a “Scroll Region” by selecting View > Scroll Region. A “scroll region” determines which columns are locked into place on the window, and which ones can be scrolled left to right. If you are having difficulties viewing some of the columns, check the scroll region to see which columns you have locked in place (a tick will appear next to the last column locked).
|
9. To maintain the forecast for one of the cost centre lines, highlight the line and press Act. Fore. (or double click the Cost centre row)
10. To enter the forecasted costs for the selected item, press Spread.
11. Enter the starting month for the budget, the amount per interval, the number intervals, and the type of interval.
•E.g. for an item with a cost of $1500 a month starting in October 2024 and occurring until Apr 2025, the starting month would be in October 2024, the amount would be $1500 with 6 period intervals set to monthly.

12. Press OK to save your changes.
13. You can also use the other ‘period interval’ selections to spread the forecast on a ‘Quarterly’, ‘Half yearly’ or ‘Annual basis
14. If you are spreading over several years, you can also get the system to automatically apply a % increase every year for up to 10 years
15. It is possible to update one of the lines in the Forecast by clicking directly into one of the columns for the line and typing in the new value.

16. Press OK to the item to update the changes.
17. To set the total forecast matching the original budget (i.e. all expired amounts will be forecasted) into the next period after the current period, select Bal. all.
18. A message will appear advising that you are about to Auto Balance all expired amounts for the job. To proceed, press Yes.
19. All expired amounts will be used, to adjust the value in the first Forecast Period. All lines for the forecast will turn black to indicate that the Forecast line is balanced. i.e. Current Budget LESS Actuals to Date (up to selected period) should now equal the total Forecast
20. Press Save to accept all the changes to your Forecast. Click OK to close the forecast and return to the main form.