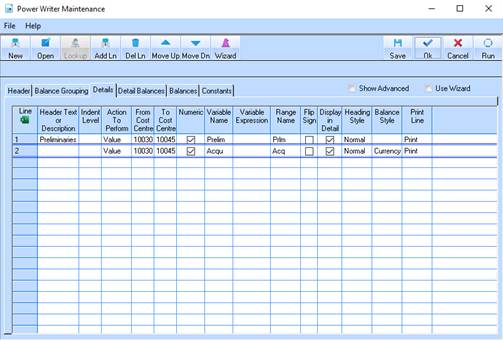
.
. 1. Select
the Show Advanced checkbox .
2. Click on the Add Ln button, and choose Last Row.
3. Enter a Description for the detail row, for our example this will be: Demolition.
4. Click in the Indent Level field and enter 1. This will ensure the report appears on the left hand side of the spreadsheet.
5. In the Action To Perform field enter “Value”.
6. In From Class Code field press the Lookup button. The following window will be displayed:
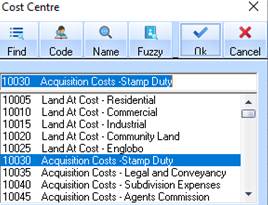
7. Select a distribution code and press the OK button. Press Tab.
8. In the To Class code field press the Lookup button. The Class Code window will be displayed. Select a Class Code. Press the OK button.
9. In the
Numeric field select the checkbox to ensure the class codes are sorted in
numeric order.
10. In the Variable Name field enter a value of ACQU. Position your cursor in the Range Name field.
11. In the Range Name field, enter a value of ACQ.
12. In the Heading Style field and press the Lookup button. Choose an appropriate heading style from the list and click on OK.
13. In the Balance Style field and press the Lookup button. Choose an appropriate balance style (currency) from the list and click on OK.
14. In the
Display in Detail field, select the checkbox to ensure all of the distribution codes
within the selected range are displayed. Press Tab.
15. In the Print Line field, ensure that the value “Print” is displayed. Press Tab.
16. In the Detail Height field, select a value of “Auto Size”.