 .
.1. To show our budget with variations, we will need to add up the first and the second rows. This can be done with a formula in the balance row.
2. Select the Add Bal button and select the Last Row option.
3. In the
Balance Type pick list, select the “Formula” value by pressing the dropdown
arrow .
4. Position your cursor in the Balance field and right mouse click. The following dialogue box will be displayed:
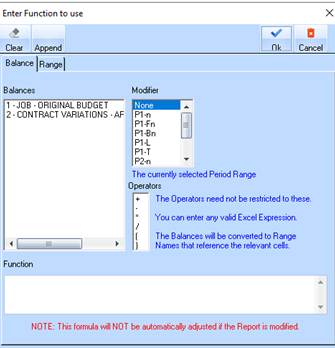
5. In the Balances list box, double click the balance you would like to add to the formula. For the purposes of this exercise, double click the 1 – JOB – ORIGINAL BUDGET option.
6. In the Operator list box, double click the operator you would like to use. For the purposes of this exercise, select the +.
7. Again in the Balance List box, double click on the balance you would like to add to the formula. For the purposes of this exercise, double click on the 2 – CONTRACT VARIATIONS – APPROVED (ALL) value.
8. In the Operator list box, double click on the operator you would like to use. For the purposes of this exercise, select the +.
9. You will now see the formula we have created in the Function box. Press the OK button.
10. Position
your cursor in the Print Balance field and select the checkbox  .
.
11. In the Balance Style field, right mouse click. Select a style for the balance.
12. Position your cursor in the Column Heading field and enter a relevant column heading. For the purposes of this exercise, enter a value of “Budget + Variations”.