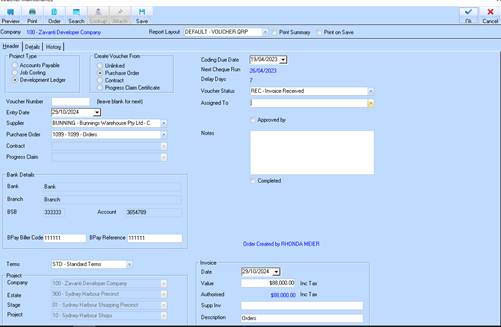
To create a new voucher
1. Select the New button from the Toolbar. The following window will be displayed:
2. The Voucher Number field is used to allocate a unique number for the voucher. This can be a system generated number if left blank or you may elect to nominate your own numbering system for your organisation. For the purposes of this exercise, leave the field blank and press the Tab key.
3. The Entry Date field is the date the voucher was entered into the system. The system will default this value to the current date. Press the Tab key.
4. The “Assigned To” box determines who receives notifications to approve the Voucher, refer to email notifications above.
5. The "Approved by" check box is to be used to control if Voucher is approved ready for invoicing. The Check box above will ONLY be enabled for those users with the 'Approve/Unapprove Vouchers' user security option set or user security is set as a 'System User'.
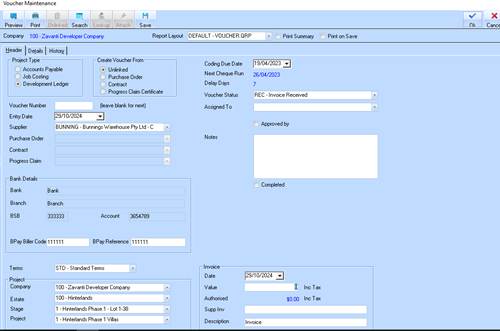
6. The
Supplier pick list is used to indicate the Supplier that is attached to the
Voucher. To enter a Supplier, press the drop down  arrow and select a value from the
list.
arrow and select a value from the
list.
7. When selecting a Supplier, the Voucher maintenance window displays the BANK details of the supplier. This can be used to check that the details you have in the system for the supplier match the details provided on the supplier’s invoice to ensure your payments are processed to the correct bank account If the Supplier bank details need to be modified, you can do this directly from the Voucher window, by using the right mouse click function on the Supplier selection field, and selecting 'properties'. You will only be able to do this if you have the required security setting.
8. If the user now sets the BPay fields on the Header TAB, they will not reset unless the user clicks on the Supplier fields again, or reselects a different supplier.
9. The P/Order (Purchase Order) pick list is used if a Purchase Order has been created in the system for the invoice. For the purposes of this exercise, leave the value blank and press the Tab key.
10. The Terms pick list will default based on the selection you made in the Supplier field. Leave the defaulted value and press the Tab key.
11. The Date
field is used to enter the date specified on the paper invoice. This value will
default to the current date. To select another value, press the drop down arrow and select a value from the
list.
12. The Value field is used to enter the amount of the invoice. Enter a dollar figure and press the Tab key.
13. The Supp. Inv field is used to input the Supplier’s reference that is the Invoice number. Enter a value and press the Tab key.
14. The Description field allows a user to enter a short description regarding the invoice. Enter data into the field and press the Tab key.
15. The Project
Type group box allows the user to select where the invoice is going to be
processed. You can post to the Development Ledger, Accounts Payable or the Job
Costing modules. To make your selection, press the corresponding radio button
 beside each option. The system will
modify the display of the screen depending on your selection. For the purposes
of this exercise, leave the default of the Job Costing. Press the Tab key.
beside each option. The system will
modify the display of the screen depending on your selection. For the purposes
of this exercise, leave the default of the Job Costing. Press the Tab key.
16. The Company
field will default to the Company that you logged in as. Should you wish to
change the selection, press the drop down arrow and select a value from the list?
17. The Estate
field is used to indicate the Estate that the invoice will be charged to if
Development Ledger Project Type is selected. To select a value, press the drop
down arrow and select a value from
the list. Press the Tab key.
18. The Stage
field is used to indicate the State that the invoice will be charged to if
Development Ledger Project Type is selected. To select a value, press the drop
down arrow and select a value from
the list. Press the Tab key.
19. The Project
field is used to indicate the Project that the invoice will be charged to if
Development Ledger Project Type is selected. To select a value, press the drop
down arrow and select a value from
the list. Press the Tab key.
20. The Job
field is used to indicate the Job that the invoice will be charged to if Job
Costing Project Type is selected. To select a value, press the drop down arrow and select a value from the list.
Press the Tab key.
21. The Coding Due Date field allows a user to specify a date that action on the invoice is required by. The system uses this field to indicate whether a Voucher is Overdue.
22. The Next Cheque Run Date field is calculated and displayed by the system for your information.
23. The Voucher Delays Days field is calculated and displayed by the system for your information.
24. The Status pick list is used to assign a status to the Voucher. Select a value from the list and press the Tab key.
25. The Assigned to pick list allows you to select a person within your organisation who is responsible for further processing of the invoice. Select a value from the list and press the Tab key.
26. The Notes field is used to enter any relevant details regarding the invoice or voucher. Enter desired text related to the voucher.
27. You can save the Voucher at this point using the Save button as shown below. After saving you can attach documents to the Voucher as described below.
28. The
Completed  checkbox will default to
unchecked. This will be automatically set by the system when the voucher has
been actioned. Leave the checkbox blank and press the “Details” tab. The
following window will be displayed:
checkbox will default to
unchecked. This will be automatically set by the system when the voucher has
been actioned. Leave the checkbox blank and press the “Details” tab. The
following window will be displayed:
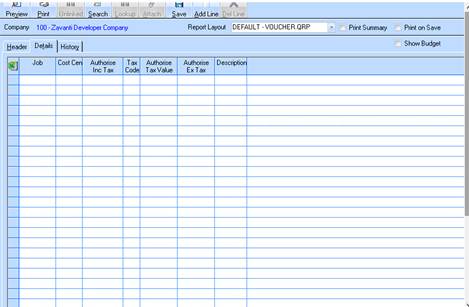
29. Select the Add Line button. The line is now enabled so you may enter details of the invoice.
30. The Cost Centre pick list is used to assign a Costs for the invoice. Select the Lookup button. The following dialogue box will be displayed:
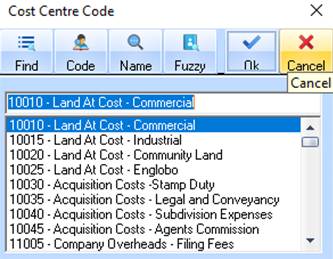
|
|
You may also initiate the Lookup function by right clicking the field and selecting Lookup. |
31. Select an item from the list and press the OK button. You will notice that the system defaults the Budget and Tax Code field entries based on your selection in the Cost Centre field. Press the Tab key.
32. In the Authorise field, enter the amount of the invoice. Press the Tab key.
33. In the Description field enter the short description of the invoice. Press the Tab key.
34. The Company, Estate, Project and Job fields will default for you. Leave the values as defaulted and press the OK button. The following dialogue box will be displayed:
35. Select a printer from the list and press the OK button. A hard copy of the Voucher will be generated to be attached to the paper invoice.
36. When printed, the following dialogue box will be displayed:
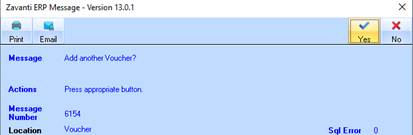
37. Select Yes or No as required.
38. Click on OK to confirm.
