Payment Run
The Payment Run function will generate payments based on the user’s selection criteria for Suppliers and Subcontractors.
This function allows a user to:
•Create a Payment Run for payments/remittances
•Create and EFT Payment Run
•Select by Account Group, Billing Cycle
•Print a Pre-Process Listing
•Post a batch
•Print Remittances
Create Payment Run
Once we have approved payments we can create a payment run to process for our suppliers. The Accounts Payable module provides a Payment Run mechanism, which we add invoices to, and the system prints remittances.
1. Open the Accounts Payable or General Ledger module
2. Click on the Payment button , and choose Payment Run, or the menu path of Transaction Ø Payment Ø Payment Run
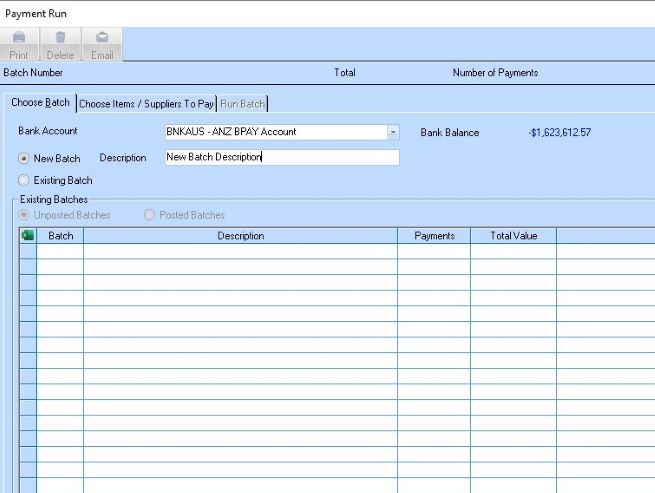
3. The following window will be displayed:
4. Ensure the New Batch option button is selected, and enter a description for this batch.
5. You may add a payment to an existing batch that has not yet been run by selecting Existing Batch and selecting the desired batch.
6. Click on the Choose Items/Suppliers to Pay tab.
7. If printing is required for Remittance option ensure that the “Printed” checkbox is marked.
8. Select
the Date Due option button, and choose a date that the invoices we are paying
are due by, and click you may select a valid Due Date by selecting the  arrow and selecting a date from the
calendar.
arrow and selecting a date from the
calendar.
9. Once a valid Due Date is selected, press the Refresh button. The screen will dynamically update the list with all invoices with a due date equal to that specified.
10. The following window will be displayed. You can also sort by Jobs – this will filter invoices by selected jobs to enable compliance with PBA legislation in Queensland.
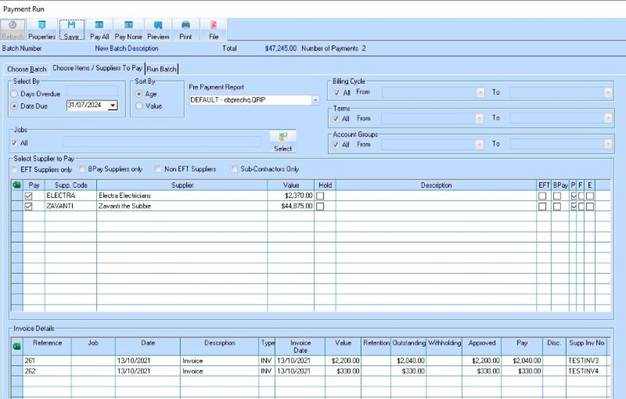
11. Users can create and then select a User template for the Pre-Payment Listing or Payment Batch Listing reports.
12. Choose a Billing Cycle to only view the suppliers with this Billing Cycle.
13. Choose a Term, to only view the suppliers with this Term.
14. Choose an Account Group, to only view the suppliers within this Account Group.
15. Choose a Job if only paying suppliers for a specific Job.
16. Click Refresh.
17. Ensure that a supplier is chosen from the Select Supplier to pay table. A check mark will appear in the Pay column for suppliers that match the criteria that we entered in the above steps. If unchecked the Supplier will not be paid in this payment run.
18. You will also note that the Run Batch Tab is now enabled.

19. You can edit each invoice by manually entering a value in the payment box of each invoice if required on the Invoice Details box.
20. Ensure you click on Save after making any manual adjustments.
21. When you have finished editing the payment details you will be shown at the top the number of payments and the total value of the payment run.
22. Press the Save button to confirm the selected payments.
23. Click on the Run Batch tab. The following window will be displayed:

24. You have a choice of paying by cheque, EFT or Bpay. If you pay by cheque, you can choose to print the remittances as well as the cheques.
25. To email remittance advices to suppliers directly as a PDF attachment, click in the “Email Remittance Advices” checkbox. Emails will only be sent where a valid email address has been maintained against the supplier properties.
26. Choose the date that will appear on the cheques from the Date drop down box.
27. Enter the first cheque number in the First Payment/Cheque Number text box.
28. Choose to Print Cheques, and if necessary remove the tick from Print Remittance Advices and Batch Listing check boxes. Notice that the report layout changes depending on what selections we have made here.
29. Select the Process button. The following dialogue box will be displayed:

30. Select the appropriate printer for any cheques, remittances or batch listings you have selected to print.
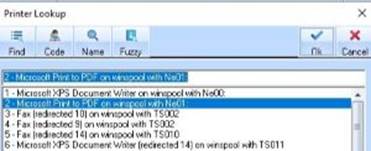
31. Select a valid networked printer and select the OK button. The following dialogue box will be displayed:
|
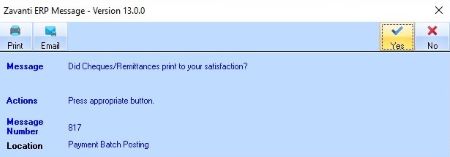
|
You should always wait to confirm this dialogue box until you have checked and confirmed your print out. |
32. Once print outs are confirmed, the following dialogue box will be displayed:
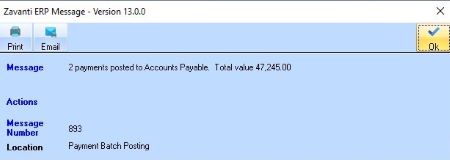
33. This dialogue box displays the number of payments and the total value. Press the OK button. The user will be returned to the Accounts Payable window.
Create EFT/BPay Payment Run
Once you have approved payments you can create a payment run to pay your suppliers via Electronic Funds Transfer using EFT or Bpay accounts. The Accounts Payable module provides a Payment Run mechanism, which we add invoices to, and the system to pay by EFT using either ABA files or Bpay format files for lodgement with your bank. You commence by selecting either the EFT or Bpay option is selected the system will look for any supplier with the “EFT or BPay” checkbox marked in the Accounts Payable Maintenance. This area of the maintenance is also where the bank details for each supplier are stored.
1. Open Accounts Payable
2. Click on the Payment button, and choose Payment Run – select either EFT or Bpay
3. Ensure the New Batch option button is selected, and enter a description for this batch
4. Select the Bank Account
5. Click on the Choose Items/Suppliers to Pay tab
6. Select the Date Due option button, and choose a date that the invoices we are paying are due by
7. Click Refresh. Invoices from Job Costing will also be shown in the list
8. Choose a Billing Cycle, to only view the suppliers with this Billing Cycle
9. Choose a Term, to only view the suppliers with this term
10. Choose an Account Group, to only view the suppliers within this Account Group. To view all suppliers leave the All check box selected
11. Click Refresh
12. Click on the Save button to save the batch
13. Ensure that a Supplier is chosen from the Select Suppliers to pay table. There should be some suppliers that fit this criteria, and are ready to pay. The tick under the Pay column will be checked for the suppliers that meet the criteria of the Billing Cycle, Term and Account Group
14. Click on the Run Batch tab. You have a choice of paying by cheque, EFT or BPay. If you pay by EFT or Bpay, you can choose to print or email (they cannot both be ticked at the same time) the remittances as well.
15. In the File section, enter a File name. This will save a file in the folder that we can pass on to the bank for processing
16. Enter a File Description
17. Enter a Lodgement Reference
18. Enter an Email Subject if emailing the remittances
19. Remove the ticks from Remittance Advices and Print Batch Listing if required
20. Choose the date that will appear on the remittances from the Date drop down box if
21. Enter the first payment number in the First Payment/Cheque Number text box. Only enter this if it is necessary. The system will take the last number from previous EFT run and increment from here. If it has done this, you can leave this blank
22. Click Process
